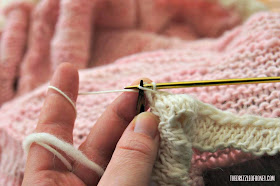
In this tutorial I want to show you how I made the knit edging around my Autumn Light Cable Blanket, so you can use this kind of edging for your next project. :)
After twelve weeks of knitting 20 squares for the knit-your-cables-afghan KAL, they all needed to be sewn together. I used the mattress stich.
I thought about crocheting them together and tried some stiches, but it didn't look that great. At least I wasn't really convinced that would be the right choice.
So, I was back to mattress stich again.
To make things easier and more evenly, I did as suggested in the KAL and used some markers to mark the middle (violett) and again the half of that (green). This way it is easy to incorporate some ease if needed.
(I'm not going to explain mattress stich at this point. I think most of you know how to do that and if not, there are a lot of videos and other tutorials where you can find how to do mattress stich.)

After a lot of patience all squares were connected.
Now all that's left is the edging.
I decided to go with an easy and simple knit edging because there are already a lot of different cable patterns on the blanket itself. It would not combine well to make a really fancy edging as well.
Since I haven't done something like this before, I searched around and found how to do that on the purlbee website and want to show it to you now.
Let's Start!
Edging in 3 Steps:
For casting off later on, it is easier to use a contrasting color for the edging. (it also looks prettier in my opinion, but that's totally up to you and your project)
Step 1.
The first thing to do, is to use your longest circular needle and to pick up stiches all around the blanket. Start at any corner. (NOT in the middle of an edge)
Be careful to pick up the same number of stiches along every edge of the blanket.
While doing so, place a marker every time you reach a corner. This is very important because you need to increase and decrease at the corners but won't see them anymore once you picked up all your stiches. (see picture to the left)
At the end (the last corner) you want to use a different colored marker to mark the beginning of the round. To join into the round, just start to knit the first stich.
Step 2.
Round 1: Knit.
Round 2: *k1, make 1 right, k to next marker, make 1 left, sl marker*, repeat from * to * to end.
Repeat those two rounds as often as you want, depending on how broad you want your edging to be. End with round 1.
Next round: purl. (this will be the outer edge of your edging/ the part where the edging is folded over, you don't need to do this, you can just knit another round if you want to)
Second half of edging:
Round 1: Knit.
Round 2: *k1, k2tog, k to 2 sts before next marker, ssk, sl marker*, repeat from * to * to end.
Repeat those two rounds as often as you repeated them before for the first half of the edging.
Weave in all ends, so they disappear within the edging.
Step 3.
Now the edging is folded over, connected to the blanket and cast off at the same time.
Fold the edging over and pick up one of those bumps from casting on the stiches (made in step 1) using your right needle.
(if you're using a contrasting color of yarn you can easily see them)

Put this stich onto your left needle. (the right needle was only used for help)
Now knit the first two stiches on the left needle together. (the stich you just picked up and the first "normal" stich on the left needle)
Repeat this one more time. (pick up the next bump/ stich, slip it onto the left needle and knit it together with the next "normal" stich on this needle) You have now 2 stiches on your right needle.
Just like a usual cast off, pass the the first stich on the right needle over the second. (see picture)
Now reapeat from beginning. (pick up the next bump/ stich, slip it onto left needle, knit it together with next stich and cast off)
Do this until you all stiches are cast off. And ta-daaa! You have a simple, nice and neat edging! :)
Have a wonderful day! :)
Stefanie


No comments:
Post a Comment